Cleaning the fans
Warning: Always disconnect the power plug before starting maintenance on the ventilation unit. The unit has no safety switch that would switch the power off when the door of the unit is opened.
Check the cleanliness of the fans when servicing the filters and the heat recovery cell. Clean the fans as required.
Important:
The fans are extremely sensitive to external shocks. Handle the fan blades carefully. Do not remove or move the fan blade balancing weights.It is recommended that the fans be cleaned in place, i.e. without attempting to remove them.


To clean the fans:
- Disconnect the ventilation unit from the mains electricity supply.
- Undo the door screws to open the door of the Vallox ventilation unit.
-
Lift the door off.
CAUTION: The door is heavy.
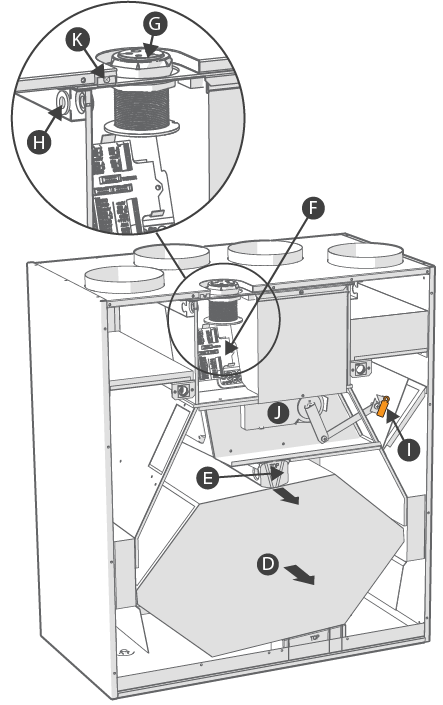
- If the length of the cables that are led out of the unit through the ceiling bushing (G) and connected to the connection card (F) in the electric box prevents moving the fan chamber sufficiently far from the ventilation unit, disconnect the cables. Pull these cables out of the unit through the ceiling bushing.
- Detach outdoor and extract air temperature sensors from the ceiling mounts. Remove the round feedthrough rubbers (H) from the slots on the intermediate walls of the unit by pulling.
- Undo the earthing screw (K) on the upper left corner of the electric box.
- Release the damper motor (J) by placing the orange magnet (I) on the magnet icon on the damper motor. Observe the location of the magnet so that you will be able to return it to its original location after maintenance. Remove the bar from the joint of the damper. Turn the crank of the damper motor so that the bar comes off from the bypass damper and turn the damper into the cell bypass position.
- Pull out the upper support of the cell (E). Lift and pull the cell (D) out of the unit.
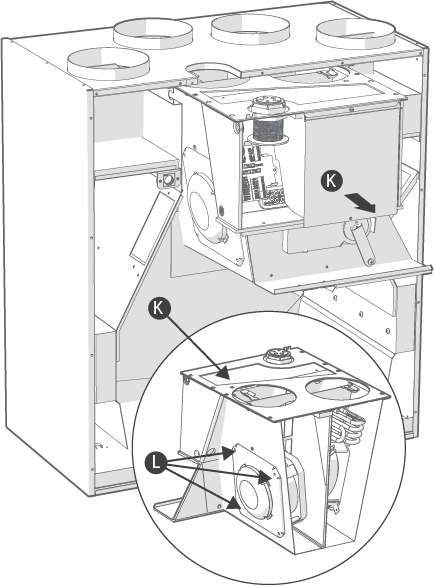
- Pull the fan chamber (K) out of the unit (contains the fans, electric box, and the bypass duct incl. the damper motor).
- The fans are mounted on the fan chamber by means of three screws (L). Do not undo the earthing screw at the bottom edge on the rear wall side.
- Disconnect the quick connectors of the fan cable.
- Clean the fans. The fan can be cleaned with compressed air (wear protective goggles) or by brushing it gently.
- To reassemble the ventilation unit, follow the above steps in reverse order.
Important:
Remember to reconnect the bar of the damper motor into the joint of the damper and to lock the connection with the orange magnet. Ensure that the sensors and their feedthrough rubbers are in correct locations. Also ensure that all the connections have been correctly implemented and the earthing screw is in place in the left corner.
