Removing and cleaning the supply air fan
Important
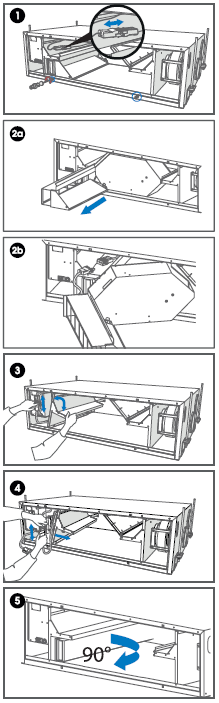
Remove the fan beds and the bypass duct carefully in accordance with the below instructions to prevent damage to the unit. The small size of the unit restricts the space available for servicing.
To clean the supply air fan:
-
Disconnect the ventilation unit from the mains electricity supply.
-
Unfasten the four screws to open the door of the unit.
-
Lift the door off.
-
Remove the extract air filter (C), the cell top bracket (E) and the heat recovery cell (D). See the section called “Replacing the filters (User)” and the section called “Cleaning the heat recovery cell (User)”.
-
Remove the mounting screws of the fan bed (2 pcs).
-
Pull the bypass duct/filter stand package out of the unit and turn to the right.
-
Remove the cable connector (black) of the fan and move the supply air fan slightly to the right.
-
Remove the post-heating radiator connector. The post-heating radiator connector can be removed by moving the supply air fan slightly to the right.
-
Tilt the supply air fan to the right and push the connectors out of the way. Turn the fan 90° and tilt it forward to pull it out of the unit.
-
The fan has now been removed for cleaning.
-
To reassemble the ventilation unit, follow the above steps in reverse order.
-
Close the door of the unit. Ensure that the safety switch catch of the door is touching the safety switch, allowing the unit to be turned on.
-
Plug the ventilation unit back into the mains.
-
The fan has now been checked and cleaned.
Note
Install the fan beds in a reverse order.