Updating the unit software
We recommend that the latest software version be always used. Check and download the latest version at www.vallox.com or at cloud.vallox.com either before or immediately after setup.
The current software version of the ventilation unit is shown on the control panel display when the unit is connected to the mains or factory settings are restored. Alternatively, the current software version can be checked from the Diagnostics display of the menu.
Note
You can update the unit software either through the MyVallox Control control panel or by connecting the ventilation unit to the MyVallox Cloud cloud service. Once the ventilation unit is connected to the cloud service, software is updated automatically.
To update the ventilation unit software through the MyVallox Control control panel:
-
Download the latest update package on your computer from the Vallox website at www.vallox.com or from the front page of the MyVallox Cloud service at cloud.vallox.com. The latest update can be found under "Latest firmware".
Note
The name of the update file to be transferred must always be the same, namely HSWUPD.BIN. If you have previously downloaded an update file onto your computer, remove the old file before downloading the new one to ensure that the file name will remain unchanged.
-
Make a note of the fan settings from the MyVallox Control control panel:
-
Select Settings:

-
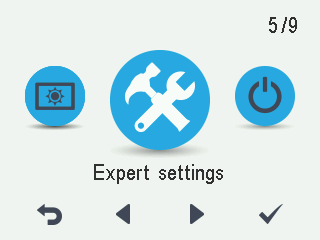
Use the arrow button to move to section Expert settings.
-
Select OK:

-
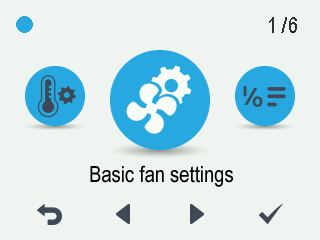
Use the arrow button to move to section Basic fan settings.
-
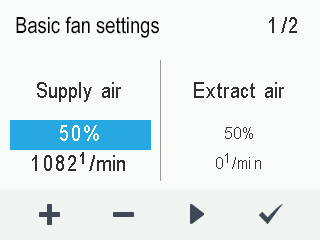
Make note of the supply and extract air fan percentages that are shown on the display.
-
Select OK:
-
Select At home profile.
-
Select Profile information:

-
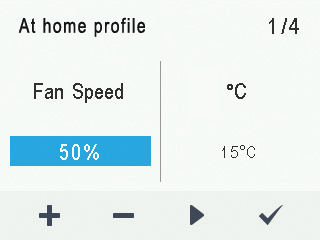
Make note of the Fan speed setting of the At home profile that is displayed on the display. The speed of the Away profile is normally 30% lower and the speed of the Boost-profile is 30% higher than the speed of the At home profile.
-
-
Turn off the ventilation unit and disconnect it from the mains (or disconnect the fuse).
-
Connect the computer to the control panel of the ventilation unit using a USB Micro-B connector.
-
Turn on the ventilation unit by connecting it to the mains (or by reconnecting the fuse).
Note
-
The MyVallox Control control panel cannot be used if the control panel is connected to a computer. In such a case, a USB sign will be shown on the display of the control panel.
-
If the computer cannot find the ventilation unit, a charging cable has probably been used to connect the devices. Replace the USB Micro-B cable with another cable.
-
-
Once the ventilation unit has started, the computer will display the control panel as a removable disk in the resource management.
-
Copy the HSWUPD.BIN update package you have downloaded and paste it to the control panel, i.e. to the root of the removable disk.
Important
Do not change the file name.
-
Ensure that the update package has been fully copied by selecting the safe removal of the USB device option. This function is selected differently in each operating system.
Note
In Linux, run the sync command.
-
Disconnect the USB cable.
-
The control panel will take a moment to download the update file (the progress of the download is shown on the display) and will then transfer the update package to the ventilation unit on the background. This takes around 4-5 hours. The control panel will remain turned on during the update process but it is recommended that the control panel be not used during that time.
-
The computer will start using the new software after the update is complete and will restart automatically. However, it is recommenced that the unit be disconnected from the mains for a moment (or the fuse is disconnected) after the update is complete.
Note
The ventilation unit must be turned on throughout the update process. If the power of the ventilation unit is cut during the update process, the transfer process will start again from the beginning and will take another 4-5 hours.
-
If the logo display is shown on the control panel for over ten minutes after the restart, start again from step one.
-
If a red error display appears on the control panel asking the user to download the update package again, start again from step one.
Note
If the setup settings have not been saved, they need to be made again after the software update.
-
-
The update is now complete. Make sure that the update was completed successfully:
-
Select Settings:
-
Use the arrow button to move to section Service menu.
-
Select OK:
-
Use the arrow button to move to section .
-
Select OK:
Ensure that the type and serial numbers are visible and that the software version specified on the display matches that specified on the cloud.vallox.com website.
-