
Asennus kattoon (Vallox 101 MV)
MallIin Vallox 101 MV on saatavissa lisävarusteena kattoasennuslevy. Kiinnitä kattoasennuslevy seuraavasti:
- Kattotuoleihin tai muuhun runkorakenteeseen M8-kierretangoilla siten, että tangot kestävät koneen painon.
- Varmista asennuslevyn vaakasuoruus, sillä asennuslevy määrää koneen asennon.
- Kattoasennuslevyn valkoisen peitelistan yläreunan voi asentaa kattoa vasten. Kattoasennuslevyn voi myös upottaa, jolloin katto voi olla 30 mm alempana kuin valkoisen peitelistan yläreuna.
Huomautus: Varaa asentaessa koneen eteen vähintään 555mm tilaa, jotta huolto on
mahdollista.
Huomautus: Asenna ilmanvaihtokone paikkaan, jossa lämpötila ei laske alle + 10 °C.
Eristä kanavat kondenssivedeltä myös koneen ja kattoasennuslevyn välistä.
-
Kiinnitä kattoasennuslevy:
- Kiinnitä kierretangot kattotuoleihin tai muuhun runkorakenteeseen ja kierrä niihin mutterit.
- Nosta kattoasennuslevy paikoilleen.
- Työnnä vaimennuskumi ja aluslaatta paikoilleen kuhunkin kierretankoon.
- Säädä muttereiden avulla kattoasennuslevy suoraan.
- Lyhennä kierretankojen alapäät siten, että ne ovat enintään 5 mm mutterien alapuolella.
-
Asenna ilmanvaihtokone kattoasennuslevyyn:
Varoitus:
Kone on erittäin painava. Älä suorita tätä toimenpidettä yksin.
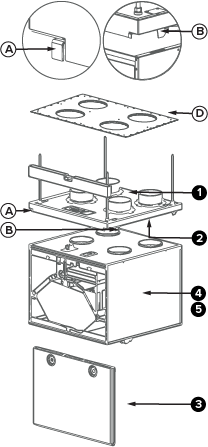
Yläpohjan läpivientilevy:
Yläpohjan läpivientilevy (D) on lisävaruste. Eristettyä yläpohjan läpivientilevyä käytettäessä on varmistettava höyrysulun tiiveys.
Yläpohjan läpivientilevyn voi kiinnittää valmiiseen takaseinään. Yläpohjan läpivientilevyn minimietäisyys valmiisiin sivuseiniin on 15 mm.